Stoma Management
The Stoma
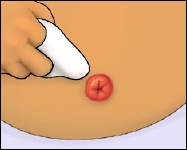
1. Round in shape.
2. Pinkish/red in colour.
3. Stoma may be swollen
4. Surrounded by stiches which will hold it in place.
5. Sticheswill eventually disappear.
6. Stoma will reduce in size.
7. Will pass faeces and in some cases will secrete mucous.
8. Stoma will have no feeling and will be insensitive to pain.
2. Pinkish/red in colour.
3. Stoma may be swollen
4. Surrounded by stiches which will hold it in place.
5. Sticheswill eventually disappear.
6. Stoma will reduce in size.
7. Will pass faeces and in some cases will secrete mucous.
8. Stoma will have no feeling and will be insensitive to pain.
Potential Problems
1. Stoma Retraction - This is when the height of the stoma goes down to or below skin level.This is likely to happen soon after surgery, and as normally down to the colon not being active as much as it should be. This is potential problem is solved by changing the system to math the stoma shape.
2. Prolapse - This is when the bowel extends outside of the abdominal wall. This will be resolved by undergoing surgery.
3. Sore Skin - Normally aorund the stoma area. This could occur through constant removal of the system, allergy to products, leakage of faeces and digestive enzymes,or could be down to having the wrong size appliance.
4. - Bleeding - Either from the surface of stoma or from the inside of the stoma.
5. Constipation or Diarrhoea - This could be down to the diet or medication.
6. Odour.
How do I empty my stoma bag?

Normally the best time to empty you're stoma bag is when it is one third to a half full. Waiting till the bag is completely full can cause pressure to be applied to the seal therefore increases the risk of leakages. If you use a reuseable bag you will empty the bag into the toilet, and if you use a different bag each time you would dispose of the bag completely.
The following steps explain how to empty a stoma bag with a clamping system:
1. Access a toilet.
2. Sit back on the toilet or if easier you may like to kneel or bend over the toilet.
3. Take the end of the pouch, and hold it up.
4. Remove the clamp, and drain the bag by squeezing the contents into the toilet.
5. Once empty, clean the end of the stoma bag to avoid infection with either toilet paper or a wet towel. Some people may also like to rinse the bag however it is not neccessary.
6. Close the bag by the clamp.
How do I change my stoma bag?
The method of changing you're stoma bag normally depends on the type of appliance that you have. The stoma nurse will give you specific instructions and guidlines on how to change your type of stoma effectively. This section goes through the basic information about how to change a stoma appliance. It is normally a good idea to create a routine of when to change yor appliance. This routine can be created when you are used to your stoma, and are able to establish what times of day your stoma is more active such as after meals. Therefore it is best to change your appliance when the stoma is less active for example in the mornings.
10 steps to changing you're stoma bag:
1. Ask stoma nurse about how often you should change you're bag/appliance
2. Check you got everything you need. Warm water, absorbant wipes, new bag,applaince, and disposbale bags.
3. If using a drianable bag, empty the contents in to the toilet before removing.
4. Remove old bag. Start fromt he bottom to the top. To remove push the skin gently down away from the adhesive skin barrier, with the other hand, gently pull the bag up and away from the stoma.
5. Using warm water clean around the stoma and surrounding skin. Soap can be used however avoid using any harsh soap, solvents or disinfectants.
6. You now need to dry the area. This can be done by either patting dry with toilet roll of kitchen roll, or by using soft absorbant skin wipes.
7. Use skin protection products explain on the Stoma accessories page, if irritation occurs.
8. Check the size of the stoma using the sizing guide provided with the stoma appliance. The bag should be 1/8 of an inch larger than the stoma.
9. Fit the new bag over the stoma, and press firmly for 30 seconds, to make sure it is secure all the way around.
10. Place the old bag in a disposbale bag and throw away. If using a resuable bag/appliance contact you're stoma nurse for advice and guidence on how to clean and refit the appliance.
Stoma Irrigation
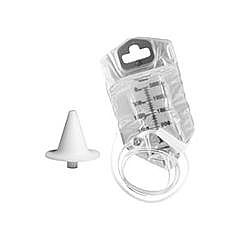
The process of irrigation is hwen fluid is inserted into the stoma in order to stimulate and empty the bowel. Irrigating the stoma will allow the person to time and contol their bowek movements, and can allow the person to be free from bowel movements for up to 48 hours. The follwing section wil outline the basic way to irriagte the stoma, for more information contact stoma nurse for advice on how best to irrigate the stoma.
Steps of irrigation:
1. Equipment - Platic irrigation container, long tube, cone, irrigation sleeve, adjustable belt.
2. Fill the irrigation container of warm water. The amount of water will depend on the person and appliance so seek advice from you're stoma nurse. Place the irrigation container at a height that is higher than shoulder level.
3. Make sure you are sitting up stright, for example on the toilet or a chair.
4. Attatch the adjustable belt to the irriagttion sleeve. The belt then goes aorund you're waist. Place one end of the irriagtion sleeve over your stoma and the other end goes into the toilet.
5. Allow a small amount of water to be released into the sleeve by releasing the clamp on the irrigation container tube. Once a small amount of water is in the sleeve reclamp.
6. Next you need to moisten the end of the cone and place it about 3 inches into the stoma. unclamp the tubing and allow the water to flow into the stoma. This should take 5-10 minutes as the water needs to go in slowly.
7. Remove cone from stoma, and continue to let the fluid drain into the irrigation sleeve for about 15 minutes.
8. Dry the end of the sleev, and clamp. You may move aorund for 30 -40 minutes untill all the water and stool has fully drained into the sleeve. Once the output has stopped draning empty the content of the sleeve into the toilet.
9. Cleanaround the stoma and surrounding area, and dry thoroughly.
